|
|
|
P1
P2
P3 |

The heading
is designed to draw your attention.
And I bet it did.
Before you start designing a project, it needs a name.
That's the secret to all Talking Electronics designs.
They all have a name so you can identify the PC board and remember the
project.
This project is a multi-purpose timer and the board is identified as:
Fish Shop Timer.
It can be used for all sorts of purposes, such as in a fish-and-chip shop timer or for a
cafe, restaurant or anywhere timing is required.
And from past-experience, I think it's needed.
How do expect a chef to concentrate on cooking 3 items at the
same time?
He can't.
It's an impossibility.
That's why you get over-cooked meat, fish and vegetables.
The answer is to give him a multi-purpose timer and the food will be
cooked to perfection.
No-one has thought of it before.
CONCEPT DESIGN
This project is called a "concept design." As it stands, the
cost of the timer is higher than those found in retail shops but none have
the features of this project.
To make it viable, it would have to be made in large
quantities in China and it is only presented here as an idea for
someone to "run with."
Out of the readership of this magazine, someone will take it and produce
a "Handy Kitchen Timer" for $3.99.
So, here's the starting point - the circuit:
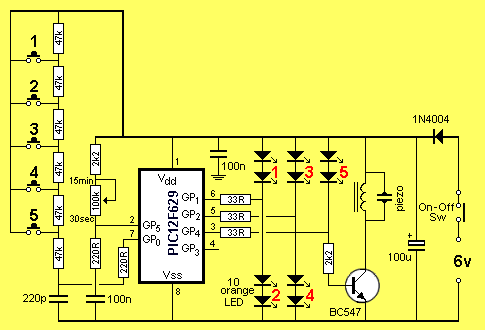
Our timer has a number of preset times, similar to a microwave oven. By
pressing the appropriate button, the timer counts down and beeps when
the time has expired. A LED shows the associated time.
It has 5 buttons, so it has 5 different timing periods. Each button can
be set from 30 seconds to 15 minutes and the timer stores this value.
By pressing the appropriate button, the preset time counts-down.
Any other button can be pressed at any time and the second time-interval
also counts down.
In fact you can press all the buttons and the timer will indicate when
each time expires by flashing the corresponding LED and beeping.
PROTOTYPING BOARD
You will notice the project has been presented on prototyping board.
There are hundreds of these types of boards on the market but
nothing suits the requirement of designing a circuit using
surface-mount and standard components. So we came up with this design.
It is
basically a surface-mount board, but with 0.1inch spacing.
If you have used any of the "matrix boards" containing an array of holes,
you will know how awkward they are to use.
When-ever the board is turned over, you have to re-think the layout and
lots of mistakes can be made, connecting to the wrong points.
When everything is on top of the board, you can see all the wiring and
its very easy to double-check the layout.
The PC board is only one of the features of this project.
Here is a list of some of the innovative ideas:
1. The use of a single-sided prototyping board makes the project easy to
construct and modify.
2. In-circuit programming has been used to save removing the chip during
re-programming.
3. Clever use of the in-out lines. Each line has a dual (or complex)
feature.
4. The button-cell holder has been altered to accept 4 small button cells.
5. A trick in the timing routine (see The TIMING ROUTINE).
The In-circuit programming is a feature worth more discussion.
The full name is: ICSP (In-Circuit Serial Programming). We suggest using
MicroChip PICkit-2 programmer to "burn" the chip.
This programmer is basically an ICSP device. It has an output that can be
connected directly to the programming socket on a project. This will
work provided the Clock, Data and Vpp lines are lightly
loaded. In our case, the xxxx line has 2 LEDs and a low value resistor
connected. This line is not considered to be "lightly loaded" but since
it will rise to more than 75% of rail voltage before it will deliver
current to the LED, this rise will be sufficient for the chip to record
a HIGH from the programmer.
We have produced a 5-pin connector to connect the PICkit-2 to this
project. See photo:
PHOTO OF CONNECTOR
PICkit-2 is low-cost, easy-to-use and comes with full software on
CD's. It reads the chip "type-number" before programming and let's you
know if the chip is ready to program (such as excess voltage on the
chip from the project - turn OFF the project before programming the chip).
LED MYTH
There is a generally accepted thought that the voltage across a LED is a fairly constant value. But this is not so.
As the current drops across it, the "characteristic voltage drop" also drops significantly.
For the LEDs used in this project, the voltage drops form 2.3v (when full current is flowing) to 1.66v when less than 1mA flows.
This value is important as we are placing 4 LEDs across a 5.4v supply and we need to know if any current will flow through the combination when the project is resting.
In our case, the 4 LEDs require 6.64v This means no current will flow when the supply is 5.4v.
To turn on the pair of LEDs for "1," GP1 is taken LOW. To turn on "2," GP1 is taken HIGH. To turn off both sets of LEDs, GP1 is made an input (high impedance).
THE PROGRAM
Using a microcontroller is like being handed a blank notebook. You can write a novel, a science report or create just about anything.
The same with a microcontroller. The possibilities with a microcontroller as simple as the PIC12F629 are almost endless.
The first thing to do is work out what requirements you need and see if they fit into the capabilities of the chip.
The chip has 5 in-out lines and one INPUT-ONLY line (GP3, pin4). The next thing is how to read a number of buttons via a single line and how to illuminate more than one LED from a single line.
You will also need to know how to produce tones, and sub-routines that are transparent, so the micro does not get "caught-up" in executing a particular routine.
These things are covered in separate articles such as "Start Here with PIC12F629."
PIC12F629 & PIC12F675
The two simplest 8-pin PIC chips are PIC12F629 and PIC12F675.
These are identical except the PIC12F675 has four A-D channels and PIC12F629 has none.
One of these channels could be used for the Button sub-routine, but we have used a slightly different method of detection using a standard input line, so either chip can be used in our project.
PROGRAMMING IN ASSEMBLY LANGUAGE
The program for this project has been created using the 35 instructions that are accepted by the microcontroller.
This is called ASSEMBLY LANGUAGE and when you are creating a program in this way, you are programming in mnemonics. A mnemonic is a set of letters or numbers that can be read by a human and easily remembered by the programmer.
For instance, "btfss 2C,3" represents the operation: "bit test 3 in file 2C and skip the next instruction if it is set." All the operations for our micro can be performed using about 35 instructions and these are very easy to remember.
Each line of your program contains a single instruction and just before the micro is "burnt," a software program called an assembler is used to change the instructions into bytes that can be read by the micro. The assembler will produce "hex" bytes and create a file with the extension .hex
The next piece of software you will use is called a Programmer and will take the .hex file and convert it to binary "1's" and "0's" for "burning" into the chip.
This process is called "programming."
Using mnemonics is called a low-level language because the instruction can be almost directly read by the micro.
You can use higher-level languages (such as C) in which a single instruction will perform a more-complex task than one of our mnemonic instructions, but as you go further up the programming ladder you get further removed from actually understanding PIC language.
Our intent is to show what can be done with a simple 8-pin PIC chip and how a program is written.
We have made programming very simple by putting the 35 instructions in a list and sample programs are available on Talking Electronics website.
By copying and pasting a sub-routine (or even a single instruction), you cannot make a mistake. Just keep to the same layout of each instruction and place them in the correct column (the layout of a program can be seen in Button sub-routine below).
There are no syntax complications, like the order of placing brackets or understanding what symbols like: "/, ^, &&" mean and if you follow our guidelines of "copy and paste" and "make one alteration at a time," you will have success.
MORE ON THE WEB
This project is much more complex than meets the eye. There is a lot of detail available about using PIC chips, creating programs etc and these can be found on the web by simply Googling PIC12F629.
The web is definitely the most incredible invention since "moveable type" and since it is the result of millions of individual contributors, you will find an enormous amount of assistance at: "PIC Micro Webring." In addition you will find information on "Talking Electronics Website." Click: "Fish Shop Timer" in the left index.
TRANSPARENT SUB-ROUTINES
Most of the routines provided in text books contain the relevant instructions for a particular operation. But none of them allow the sub-routine to be carried-out and the micro to return to the main routine. Some sample routines even include a loop in a button routine that prevents a return until the button has been released. Obviously this will hold up the operation of our timer is unsuitable. We need a sub-routine that is called and returns as soon as possible.
This means it must carry out the operation and set a bit in a file - or clear a bit - (called a flag file) so the result can be operated on. We call this routine "transparent" because none of the registers (that are looked at) are altered and the result is kept in a flag file.
We will be explaining these flag instructions later.
In our case, the input buttons need to "polled" (looked at) regularly to identify if a button has been pressed.
This can be done in a number of ways. The program can be designed so it goes to a location (address 04 in the program) called the Interrupt Location (or Interrupt Vector Location), on regular basis, such as every few milliseconds. At this address is an instruction that sends the micro to the sub-routine to look at the buttons. It will be a single instruction such as GOTO ISR (goto isr). That's why you don't start a program at address 0000 and continue through address 04, 05 etc as you may use "isr" and it needs location "04." At address 0000 place: goto Main. Leave 0001, 0002, 0003 empty and put "goto isr" at address 04.
org 0x00 ;origin (in decimal) - reset vector address
goto Main ;(this instruction will be at address 00)
org 0x04 ;address 04 (in decimal) - Interrupt Vector address
goto isr ;go to Interrupt Service Routine (this instruction will be at address 04)
Again, the isr sub-routine needs to have a flag-file to identify which button has been pressed.
Alternatively the MAIN routine can constantly scan the buttons.
Or the micro can be set up to scan the buttons when it detects a button has be pressed.
We will be using a feature where the operation of the micro is interrupted by a counter and it is sent to address 04.
MULTI-TASKING
The micro will be carrying out MULTI-TASKING in this project. It will be decrementing a number of files (the timing files) and at the same time checking to see if a button has been pressed.
For this reason we need to set up the program so that these operations can be carried out.
One thing we want to do is detect when a button has been pressed for 3 seconds. We cannot keep looping around a routine for 3 seconds as this will hold up the program from doing other operations, so we must have a file that is incremented while a button is pushed to identify the 3 seconds.
The easiest way to do this is call the button routine every 15 milliseconds and when a file is incremented 200 times, the result will be 15 x 200 = 3 seconds.
To do this we use one of the timers (Timer0) and get it to increment each time an instruction is carried out.
We then set bits so that when the timer "ticks over" from FF to 00, the micro stops the current instruction and goes to address 04. At address 04, the micro executes the "goto" instruction. We call this instruction the ISR (Interrupt Service Routine).
Timer0 can only count to 256, so we add a pre-scaler to the front end to divide the incoming clock-line by 64. This produces a result of 16,384uS (16.3mS). By incrementing another file 183 times we get 3 seconds.
This covers two features. The button routine is scanned every 16mS and a 3-second button-press can be detected by incrementing a counter.
The only other operation carried out in the "isr" section of the program is decrementing of 5 "timing files." These are ALL constantly decremented every second and when a file reaches 00, it is checked to see if the particular timing-button has been activated. If the timing has been activated, a beep will be produced for 10 seconds.
In other words we have two routines that are constantly looped, Main and ISR.
Main is looped every fraction of a millisecond and ISR is looped every 16 milliseconds.
To put it more accurately: Main is looped on a constant basis and every 16 milliseconds the micro is sent to isr (address04) where it goes to the Button sub-routine.
THE BUTTON ROUTINE
We have opted for the simplest routine to detect a button-press. It uses in/out line GP0 (pin 7)
and the routine firstly discharges the 220p capacitor then waits for it to charge to a point where the input line detects a HIGH. Even though we do not know the voltage level at which this occurs, it will be the same percentage value of the supply voltage in all cases.
This will be fairly reliable over a small range of supply voltages as the input will detect a slightly lower voltage as the battery voltage reduces but the charging time will also alter to maintain the same timing. The circuit below shows the resistive ladder and the 5 buttons.
The shortest time will occur when button 5 is pressed and the longest when no buttons are pressed.
The timing for each of the buttons has been worked out experimentally and a mid-value has been provided in the routine. There will be a variation in the timing due to the value at which a micro turns on and its turn-on point due to the voltage of the supply, The exact timing will also depend on the tolerance of the resistors and especially the 220p as it will normally be 20%.
The timing for each value is more than 20% apart and hopefully all the other tolerances will cancel each other and the result will fit into the values we have provided in the routine.
From experimentation via the prototype, the timing for each of the buttons worked out as follows:
| Button | uS |
| 1 | |
| 2 | |
| 3 | |
| 4 | |
| 5 |
5-Button Circuit
Two different types button-press must be
detected. A button-press of a short duration must be detected as well as
a button press of 3-seconds. A 3-second button-press is used to set a
button to the time indicated on the "pot." This makes it a lot more
complex than an ordinary button detection.
Three files are needed.
The Button and Count files
The Button FLAG (bflag) holds two
pieces of information. Bit 7 identifies a button-press, Bit 6 identifies
the button has been released and bits 1, 2, 3, 4, and 5 identify the
button.
Two count files (bcount1 and bcount2) hold the number of loops and
seconds to detect when a button has been pressed for 3 seconds.
bflag (file 20h)
| press | release | Sw5 | Sw4 | Sw3 | Sw2 | Sw1 |
| bit7 | bit6 | bit5 | bit4 | bit3 | bit2 | bit1 | bit0 |
Button
Sub-routine:
You need to allocate a file to
button-flag (bflag) and clear it in SetUp before it is used.
In the Equates section you will need to give a file to bflag and the two count files for Button:
|
||||||
You will need
to clear the button-flag in "SetUp"
SetUp
clrf bflag
clrf bcount1
clrf bcount2
;Clear the
button flag
;Clear the
loop file
;Clear the
seconds file
In Main you will need to: Buttons sub-routine makes GP0 an output and goes
LOW to discharge the 220p. A short delay is called to do this.
1. "test" bflag to see if a button is pressed, then deal with a
pressed button and clear the flag.
2.
Main
clrf bflag
call Buttons
;Clear the
button flag
;Call Buttons sub-routine
The pin is then made an input and the 220p charges via the ladder of
resistors. The input pin is tested after a short delay to see if it is
HIGH.
The short delays between each "look" have been worked out by
experimentation and the result is at the "mid-point" (the voltage on the
capacitor), for each button.
The flag file (bflag) will contain a bit set to "1" for each button that
has been pressed.
The instruction: "goto $-1"
tells the assembler to insert the actual address during assembly ($-1
is the previous location).
Buttons
bsf status,rp0
bcf trisio,0
bcf status,rp0
bcf 05,0
movlw 10h
movwf
Delay1
decfsz
Delay1
goto $-1
bsf status,rp0
bsf trisio,0
bcf status,rp0
call DelA
btfss gpio,0
goto $+3
bsf bflag,5
retlw 00
call DelA
btfss gpio,0
goto $+3
bsf bflag,4
retlw 00
call DelA
btfss gpio,0
goto $+3
bsf bflag,3
retlw 00
call DelA
btfss gpio,0
goto $+3
bsf bflag,2
retlw 00
call DelA
btfss gpio,0
goto $+2
bsf bflag,1
retlw 00
END
;select bank 0
;make GP0 output
;select
bank 1
;make GP0 LOW to discharge 220p
;create a short delay for 220p to discharge
;16 x 3 uS
;select bank 0
;make GP0 input
;select
bank 1
;wait for 220p to charge
;test GP0
;Tells assembler end of program
DelA
movlw 25h
movwf
DelayS
decfsz
DelayS
goto $-1
retlw 00
;create a short
delay to charge 220p
;
THE "TIMING" ROUTINE
The "timing pot" is marked 30sec/15min on the circuit and PC board but
this does not actually mean the time-constant produced by the pot and
100n has these delay values. In fact the timing is less than 1
second for the 15min setting and a table is used to generate the
corresponding values for the program.
When any button is pressed for 3 seconds, the timing-value set by the
position of the pot will be entered for that button and saved in EEPROM.
After the button is detected for 3 seconds, the value of the pot is
determined in less than 500 milliseconds and a long beep is produced to
let the user know the value has been recorded. .
PROGRAMMING THE CHIP
The chip can be programmed using either Talking Electronics
"Multi Chip Programmer" (approx $16.00) or MicroChip PICkit-2 programmer
(approx $65.00).
Here's the run-down.
The 8-pin PIC chip is taken out of the socket on the project and fitted
to the Multi Chip Programmer socket and "burnt." It is then put
back into the project.
This is very easy to do.
You must have a serial port on your computer and most old-style
computers (such as "desk-top" and "towers" have a 9-pin serial port at
the rear of the computer) for you to do this.
If you don't have a serial port, you will need to buy the PICkit-2
programmer from Microchip and use the USB port.
Most (all) lap-top computers have a USB port and this programmer comes
with 2 disks containing all the software you need.
This programmer is also very easy to use and works every time.
It is designed to program "In-Circuit" and you will use the 5 pins on
the project to "burn" the chip.
You will also need to assemble the 5/6 pin connector that connects the
programmer to the project. This connector comes from Talking
Electronics.
The kit comes with a pre-programmed chip and is marked with a white dot.
But if you want to add additional features or burn the program yourself,
you will need a PROGRAMMER.
The PICkit-2 is available as a kit with a pre-programmed chip for the
PICkit-2 PC board from:
http://www.auelectronics.com/Hardware-CB0703.htm for approx $34.99(USD) as
BB0703 - Fully function PICkit 2
System Part#:BB0703. But the 2CD's of software are not included.
The instructions for assembly can be found here:
http://augroups.blogspot.com/2009/02/step-by-step-assembly-guide-for-cb0703.html
but the cost of the kit is very nearly the same as the fully assembled
kits from MicroChip:
http://www.microchipdirect.com/productsearch.aspx?Keywords=DV164120
(cost $50.00 USD plus postage). The PICkit-2 from MicroChip is a
"package" that also contains 2 CD's and an extra PC board that connects
to the programmer so any 8, 14 and 20 pin micros can be programmed. The
board contains 4 LEDs, a push-button and a pot as well as some
extra lands so you can create a small project.
For Australian residents, PICkit-2 can be purchased from
Modtronix
for approx $50.00 USD plus postage and
this includes 2 CD's of software. But I am not sure if the extra board
mentioned above is included in the "package."
The 5/6 pin connector that connects the programmer to our project must
be purchased from Talking Electronics - otherwise you will have to use
the PC board (called an experimental board) that comes with the "package" from Microchip, to
hold the chip while to gets "burnt" (programmed).
28/8/08